was taken from Pinterest, a little town in France called Crestet.
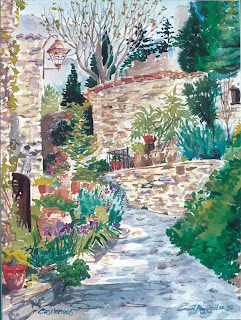
It is similar to a watercolor I did years ago (1992, and later included in my "French Light/Florida Light show) in Castelnou.
Here is a look at it Castelnou done plein air on location.

When I did "Castelnou" I used a film camera, and my photo wasn't so great to work from, so for class I took this next image from Pinterest, which offered much the same challenges as Castelnou.
The process of breaking down a complex image like this can be daunting, but we will give it a shot.
First step, the drawing and the masking fluid.
Step 2 Below: I lay down the warm washes that define the overall warm shapes in the stones
Step 3 Below: Adding purple washes into that as a glaze later, gives the work an in shadow effect
without graying down the luminosity of the stone work, and displays the sense of bounced light.
Step 4 Below: You can see I am starting to delineate and slowly intensify
the cool shadow zones allowing the color to breathe in the color field spaces.
Step 5 Adding intensity to the warm colors, more glazes in shadow areas.
Step 6 Below:
I start adding the yellows and greens and further map out the shadow areas more
distinctly. Notice in the lower right I put the cool "in shadow" blues for the plants
below the pot then painted the shadows in "negatively" to bring them "up" while
leaving them as simple color fields, not overemphasizing the details unnecessarily.
Step 7 Below: I start mapping out the tree and some branches (don't
go branch crazy here, less is more, you can always add more later)
and dark green details in the foliage. Some architectural details are emerging.
Step 8 Below: Remove the masking fluid to see what you have, remember
the masking fluid is to maintain the whites, not the shadows,
you have to think backwards here, always preserving the light.
Step 9 Below: This is where it gets interesting, you are slowly pushing the ranges of dark
and light and working the boundaries to mine and leverage your warms against the cools.
Example: Look at the purple shadows, then next to them there is a little burnt sienna next to that,
bridging the light to the dark so you feel a shift in temperature. I also boosted the cool blue wash in the wall left, to get it more in shadow. Note: I probably could have been bolder here.
Step 10 the finale: final touch ups and color tweeks are added here, accents etc.


No comments:
Post a Comment