"There is no real light on the canvas, just the illusion of real light coming from
it's surface" I said as we looked at the phone screen exploring the work in
admiration of Joseph Mc Gurl. I was having lunch after class with a good
friend of mine Henry Von Genk ( www.henryvongenk.com ) the other day,
and he was speaking favorably about a new artist he discovered named
Joseph McGurl. McGurl's work displays a fine ability to capture light,
mood and luminosity through deft use of oil glazing, a skill not often
practice by artists today. I thought later, that it would be fun to try to do
the same painting in acrylics to see if I could get the luminosity using
acrylic glazes, and extender.
Below: A painting "Transfiguration - Oil on Panel - 20 x 36"
(for more work by by Joseph McGurl see www.josephmcgurl.com )

As you can see there is a classical sensibility , and a highly disciplined level of
glazing required to achieve this smooth graduation of light and "glow". I will not
have the luxury of oil to give me loads of open time, so I propose to show how
to properly use extender and glaze combinations to buy more open time
so we could achieve the subtle shift of light we need. So let's begin.
I am using Golden acrylics and some Liquitex brands and a small 16" X 20" canvas.
Below:
First I color washed the canvas with a raw sienna with a small amount of burnt sienna
and water mix to give a warm base and to "kill the white"! Then I started the drawing
with a filbert brush and a mix of burnt sienna and burnt umber, "blocking in" the
shadows , and creating a halftone effect. I am not concerned with details.

Above:
Next I worked in some base lighter glazes that would eventually be highlight areas.
I used raw sienna glaze in the grassy areas, light glazes in the sky to "map out"
where cloud banks would be, using white and burnt umber, mostly white .
TIP: With light preliminary applications like this, you set up a tonal base for future darker glazes to help them glow. Dark on dark won't glow, but dark glaze on light base will!

Then I premixed piles of paint in subtle ranges of light yellows, to blue greys. My goal
is to apply each portion in a map-like way, but then blending the two wet
edges together to make a new set of blended colors creating a "lost edge "effect
You will not get this perfect the first time. It may come out too dark or too light,
too blue or yellow, but glazing layers can fix that later, and will "mix in the eye".
Below: You can see I am adding more layers and working some sky color into the water areas.
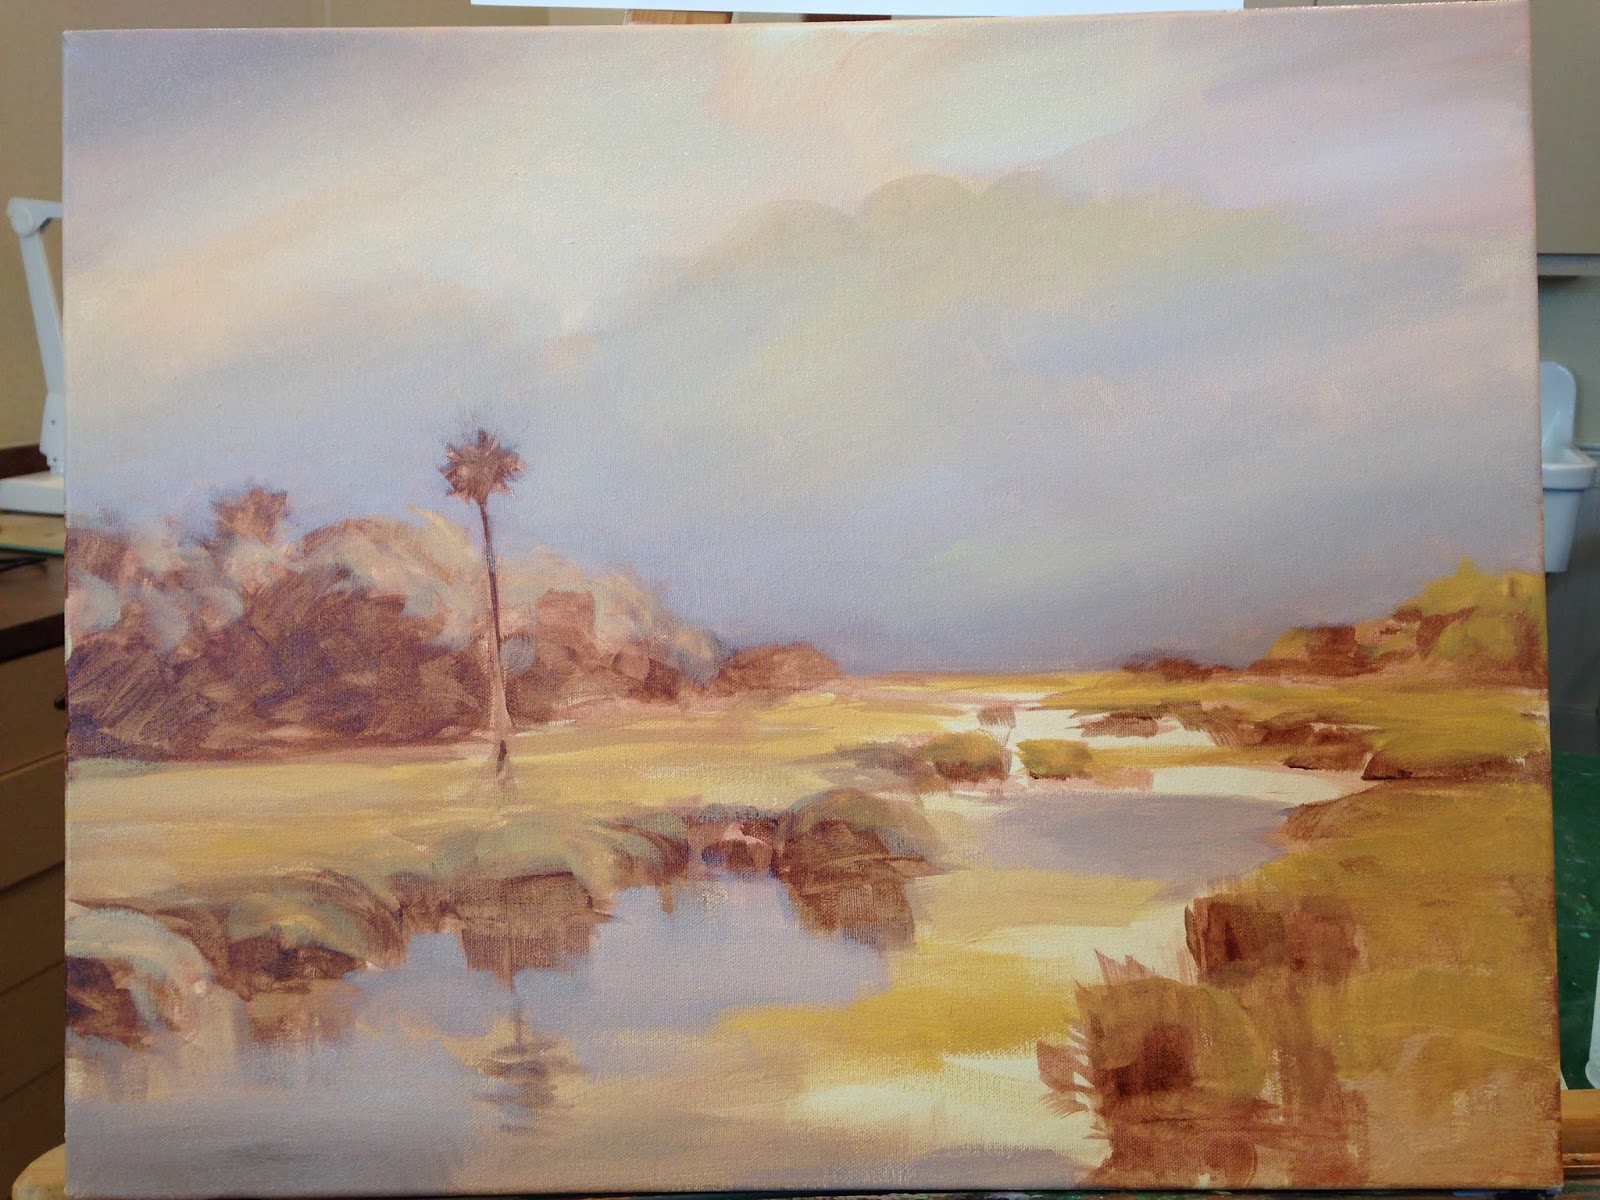

Successive layers of glazes in the sky, yellows, oranges (with white) light purple
neutrals glazes, blue grays, burnt umber glazes overlap to create multilayered mixes
in the eye. In the grasses I added combinations of raw sienna and versions of
glazed greens with chrome green, and sap to "colorize the halftone". I made
"muddied greens" (for shadows, using burnt umber and some purples mixed into
the chrome and hookers green for the shadows and cool dark greens. Don't over
simplify your greens. It is good to have a variety of green mixes here, nature is
complex. I add touches of extender in light yellow and white to enhance
the glow in the sun area, blending it out to create light rays.

Already you can see it coming together. The sky color in the water is getting
weaved together to set up the light base for the dark glazes yet to come.
Some artists may leave it bright like this, and it would be OK, but I am setting
a goal of having that mood lighting that is evident in Josephs work. So stay
tuned for the final portions of this. I will deepen the sky tones, maintaining
the lost edge effects, deepen glazes in the water to add mood
and depth to this painting.
PART 3 At today's class the steps below were the final steps
to close the aperture on this light show!

As you can make out a blue glaze was added in several locations throughout
the painting to deepen and cool the shadows. I also added a richer mix of
chrome green, cerulean blue and white in a glaze in the sky area and a thin
version in the clouds and water. I came over the bottom corner with some
glaze afterwards of burnt umber to deepen that still.


Above :
you can see how I began "pulling up the lights" like turning up a light switch.
By setting yellow oxide next to yellow, next to white, you get subtle shifts
in relationships that tell the eye a lot of light is shining there. I added a
bit of cool purple glazed into the water below that as a compliment
to the yellow on the color wheel.

You should be able to move this piece around to
get a closeup view of the various elements of the artwork.


No comments:
Post a Comment