In this demonstration I was trying to familiarize the class with better brush control. It is important to use the right brushes for the right purpose and the right glazes or extender for the desired acrylic result. In a cloud the "lost edge" is the hardest and simultaneously the most important effect in a representational piece. I say that with the exception that an impressionistic piece is an entirely different approach, allowing a more painterly style to emerge. In this case, achieving a soft lost edge is the goal. I am interested in luminosity, the glow of a cloud as I see it in real life. That is hard to capture in a photo. Because of the layering of paint through glazing a "prismatic" effect can be achieved, creating the "illusion" of a luminous lit cloud on the canvas, when of course, in fact there is none there. That illusionist technique is not practiced much in the art world today, but was a cherished goal in some classical painting. It still can be satisfying today.

This picture was taken by a friend of mine in St Augustine Florida, Nancy Vail, who lives on the waters edge. I call this Vails' View, since they see this first thing in the morning. This little island is a rookery for birds as well and a channel connects the property to the Matanzas Inlet. She has invited us to stay many nights there so I know this scene well.
The first thing I like to do is break down the scene either in my mind or in sketch form, into a map so I know where I am trying to arrive in terms of the placement of highlight and shadow, warms and cools, and composition lines.
Above: Next using a color wash on the 16" X 20" canvas to create a tone in the overall predominant color, I begin to sketch with a filbert the loose detail and composition. I use the glaze in the brush to softly indicate the shadow areas.
Above: Next I add the yellows and cerulean sky color to "block in" the main body of the cloud and it's warm light versus the cool light of the sky. There should be a lighter transition using white in the sky mix, for horizon light.
In this case I am using a little glaze with a bright white flat Princeton #8. I like the flats for this sort of work because they lay down a smoother application of glaze. Do an area and leave it alone, it is not an oil and you don't have a lot of time. Too much work will disturb the paint surface and make weird anomalies in the drying time.
Remember , you are working around the color wheel (see the left side) so as you move down the cloud toward the purples and away from the yellow, you may get a green if there is still too much, or any yellow in your mix, so as you move away from the orange into the purple shadow, remove the yellow from your brush and add red, use pink and add blue slowly.
I just keep glazing in, adding small amounts of extender with carefully selected mixes of purples.
Extender is something you only use small amounts of, whereas glazing liquid you can use much more, but it dries faster too. You can use both simultaneously to both thin and extend open time. This allows for multiple and sumptuous glazes one on top of another. It is important though to let each coat dry or you will get a chunky surface to your painting that will not be attractive to look at.
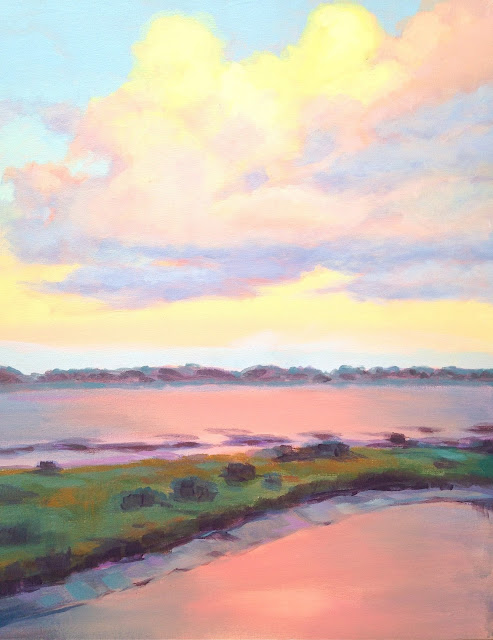
Here is the final result of multiple glazing, I still need to add some color to the area above the treeline, that will come next.
Below: The final tweak with some deepening glazes added to the water and a few extra strokes to the marsh grasses.


No comments:
Post a Comment